Thursday, August 30, 2018

rock tumbling for beginners

While I know a lot of you come here for art and creative inspiration, I have a some hobbies behind the scenes that I thought might be fun to share with you once in a while! One of my all time favorite hobbies is "rockhounding". Rockhounding is hunting for minerals, rocks, semi-precious gems, petrified wood and fossils. Living on the Oregon Coast, there are all kinds of places to go where there are exposed beds of agates and stones and I will spend HOURS crawling around on the beach looking for jasper, moonstones and agates.

While my favorite part of the process is the hunt, this summer I've really enjoyed my rock tumbler! A tumbler makes it possible to smooth and polish those rocks over time. We have a the Lortone Model 3A rock tumbler and a rock tumbler grit kit

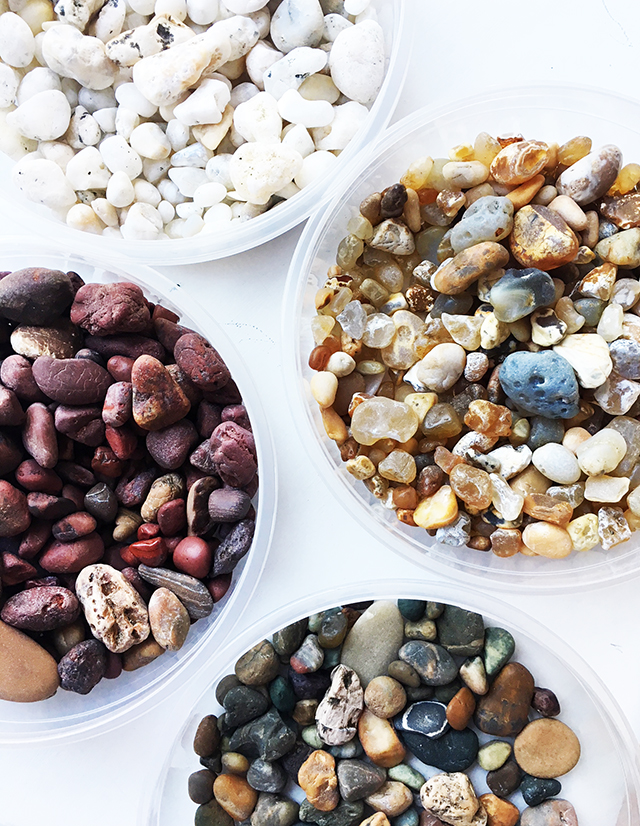
After I've spent time hunting for rocks, I spend just as much time sorting and trying to identity a lot of those rocks. 
This is actually one of Lucy's favorite things to do! We try to sort everything either by color or by the type of rock. 


Then we select a mixture of of different sizes of rocks that will get tumbled.

Next we fill the tumbling barrel about half way full.

The next step is to add a coarse grit and water to the tumbling barrel.

Grit is silicone carbide abrasive that is added to the tumbling process. The rocks roll around in the tumbler in the grit and water and over time, the grit shapes, smooths and polishes the rocks. 

There are four stages of grit-
Course grit which does the rough shaping of the rock 
Medium grit removes scratches and produces a smooth surface 
Pre-polish smooths the rock even more 
Polish shines those rocks 
 Rock shops typically sell all four levels of grit.

We tumbled the first grit for about a week or so. The result was rocks that were quite a bit smoother.

After the first tumble is finished, it is really important empty the barrel, wash the rocks and the barrel and then start the next stage.

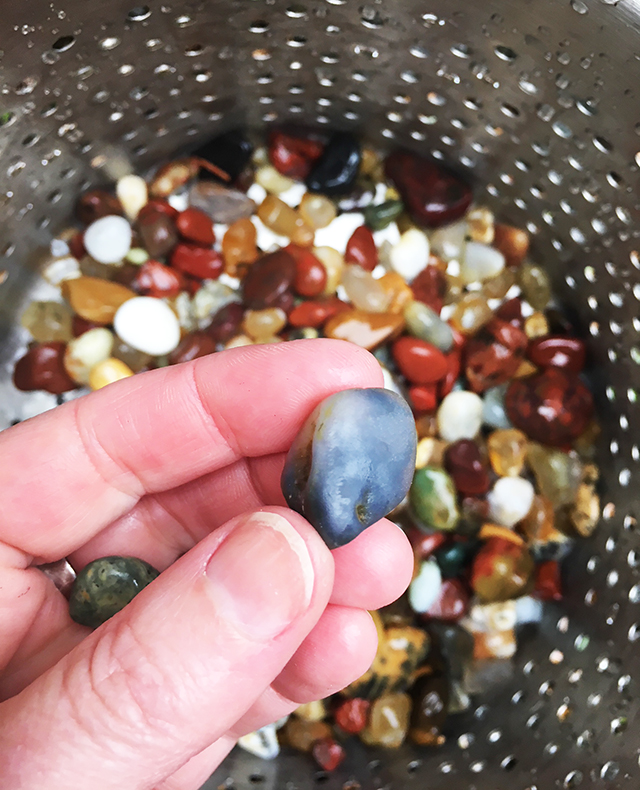
The tumbled three more times for about one week with each grit and it ends up REALLY smoothing those rocks! But they are not yet polished.

The last stage (4th stage) is to tumble those rocks with the polish- aluminum oxide for another week. 

The result is AMAZING! Beautiful smooth and shiny rocks!!


The entire rock tumbling process takes about 4 weeks and it is SO hard to wait during that time! But the end result is so worth it.


Tuesday, August 28, 2018

5 ways to add texture to your surfaces

When it comes to painting, especially colorful and messy layers, texture is a super important part of my process. And today I've got 5 really simple (and fast) ways to add some texture to those painting


1. Bubble wrap is one of my favorite things to use for adding texture to those payers of paint. 

2. Use a crumbled up paper towel or rag and dip it into paint and dab it all over the surface for unique texture.

3. I love using a palette knife to scrape and scratch into wet paint.

4. Dip anything, I mean anything from nature into paint and stamp, drag and press it onto that surface.

5. Press tissue paper into that wet paint and then paint over the top of it. The paint will highlight all the folds in the tissue paper. 

Sunday, August 26, 2018

end of summer SALE this week!


Happy Monday friends! This week I've got my annual END OF SUMMER SALE happening over in the shop. Details below!


                       Head on over the shop HERE


ABOUT MY ONLINE CLASSES:
There are many online workshops out there at different prices with different content. Back in 2009, when I decided to offer an online learning option, I set out to create a structure that is similar to taking a "live" class from me.  My mission is to provide an affordable class with a learning environment where you are watching lots of demos, learning techniques and then creating on your own art.

FACTS:
  • My classes are a combination of video learning (with demos, techniques and me talking) and lots of photo steps outs of inspiration, techniques and process.
  • All classes are all filmed in my studio. Since 2009 I have been tweaking my gear and my process with the hope that video/photo content gets better and better. My #1 goal is to provide inspiring lessons and visuals that are easy to understand.
  • My classes do NOT have a required supply list. Instead I share the supplies that I like to use and then give you a variety of options and inspiration to use supplies that work best for your process and your budget.
  • All of my classes have unlimited access which means that once you register you can create and access at any time and work at your own pace. Whenever I "release" a new class- I release each lesson "live". Many people enjoy working in this format, as the lessons are posted each week but once all information gets posted there is unlimited time to access everything. I have found that some people prefer to work along with the live format when I release a new class, while others will wait months until they have the time, money and the schedule to register for the class. Either way works- just know that once you are in- there is no deadline or pressure to create.


Wednesday, August 22, 2018

cardboard turquoise rings

If you are a long time reader, you will know that I LOVE getting creative and turning simple materials into something really fun! And cardboard is one of my favorite things to create and craft with. My parents will even tell you that when I was a kid, I would go through the trash looking for cardboard to use in my art projects. Cardboard is super versatile and it takes layers of paint really well. So well that you can even create jewelry with it. Today I thought it would be fun to share some turquoise cardboard rings that I created for my online class Camp Wanna-Create. This project is super simple but ends up being really dynamic!

I started with cardboard from our recycling bin and cut it into shapes. I collect turquoise statement rings so I cut my shapes a little larger.

Next I gave that cardboard a few thick coats of paint. While cardboard will never be waterproof, painting it will seal the surface from everyday wear.

After those layers of color dried, I used a rag and began dabbing different shades of turquoise, white and black onto the surface. My goal was to create a turquoise inspired look.

I continued to build up those layers of color with both a rag and a brush.

Then with a tiny brush I added a few details to look like veins in turquoise. 

Then I used gold acrylic paint around the edges to give the look of a soldered bezel.

Once the paint was dry, I gave everything a thick coat of polyurethane.

Last, I glued the cardboard to a ring back.

The result are some really unique turquoise rings that were made mostly from materials in our recycling bin!


Monday, August 20, 2018

lucy's room makeover

As many of you know, it's become a tradition to redecorate and paint a fresh mural in Lucy's room every couple of years. Her room is tiny and as she's gotten older, her style and interests are always changing and evolving. And this year, together we decided on a Matisse inspired wall. Lucy's middle name is Matisse and it seemed appropriate to at some point in her life create a Henri Matisse inspired wall. The best part of was planning it out and spending time painting together. Here is a little peek. 

BEFORE

I painted this butterfly mural back in 2016. 


Looking for a little more inspiration when it comes to using paint and creativity to transform a space?


Monday, August 13, 2018

tips for marketing a creative business


In my opinion marketing and promotion is one of the most important ways to grow your creative business. And if I am keeping it really honest, I didn't actually figure this out until I got a job in marketing. You see, I spent years thinking that I would make art, upload it to my online shop or get a wholesale opportunity or show my art in a gallery and things would just sell. I spent years, putting most of my energy into making art and whatever time I had left was spent on (minimal) marketing. It wasn't until I got a job in marketing at a university that I saw how important time, effort and a marketing plan was. I remember sitting in a staff meeting where we were all brainstorming ideas for a marketing campaign and a light bulb went off! I remember thinking, why in the world am I not thinking about this stuff with my art and my creative business?!?! Why don't I have a plan or a marketing approach when it comes to my art? For some reason (probably because I am an artist), I thought that a business minded approach to my art would ruin things or would take away from the creativity. But what I didn't realize was that any type of business (even a creative one) requires time and attention to marketing and getting the word out. I am here to tell you that the minute I realized how important marketing was, was the minute my business evolved and great into what it is today- a full time gig that supports our family! 

Today I thought I would share some really simple and easy things to think about when it comes to marketing your creativity business.


THINGS TO KEEP IN MIND AS YOU DIVE INTO MARKETING:

1. It really helps to begin by identifying your brand- in other words- identify the things that make you unique! Take time to ask yourself questions like:
What makes me unique?
Who is my audience or customers?
What makes me different from everyone else out there?
What do I want my life and business to look like?
What do I want customers to feel when they see my art or visit my website?
Getting honest with yourself and your brand will help you to begin making decisions about how and where you want to market your work.

2. Take some time to really figure out your goals. Do you want more customers coming to your online shop? Do you want to fill up your classes? Do you need to spread the word about your freelance services. Answering these big questions  before you launch into a marketing plan will help you take on an approach that works for your longterm goals.

3. Take time to do your research. What might work for one business may not be right for you. Spend time searching for marketing inspiration. I like to look for business and marketing resources online and the best part is that it's free. A quick search can offer up some resource and information that you can use in your own marketing approach. Doing your research and really understanding all the different ways to market and promote will help you decide what works best for you.

4. Decide if you want or need to spend money on marketing. It's ok if you don't have a budget for professional help (I never did). Try reaching out to fellow artists, crafters and small business owners. Ask for marketing opinions and advice to see what has worked for other people. I knew early on that I wanted to do it myself but not everyone wants to operate this way. If you need help or if you want to invest a little money into marketing, make yourself a budget that matches your goals.


5. Give yourself a time frame to experiment and try a handful of things. As I have mentioned, nothing it going to work over night- a marketing plan is like a long term investment of time and energy. Often you need months and months of trying, testing and putting information out there to really see results.

EXAMPLE: These days I actually give myself a 6 months to 1 year to test things out and then at the end of the year, when we sit down to crunch number and plan I can really see if my marketing has been working.

6. Creating a marketing plan can take time and a lot of trial and error. Give yourself permission and time to experiment and figure out what works best for you. Also keep in mind that it's totally normal to fail or not get things right. This stuff takes time to figure out and it can look different for everyone. Things not working or even failing can actually be a great way to make decisions moving forward.


18 FREE WAYS TO CREATE BUZZ FOR YOUR CREATIVE BUSINESS

1. Trade advertising with fellow artists
2. Post your work on Instagram or Facebook
3. Use Instagram to share photos from your life and business
4. Offer contests
5. Start a blog
6. Sponsor an event- either live or virtual
7. Create a video series YouTube
8. Build an email list or newsletter list
9. Offer coupons and discounts for products and services
10. Share a free tutorial
11. Plan giveaways for customers
12. Offer a deal or discount to specific social media followers (instragram, twitter, etc)
13. Team up with fellow artists and bloggers to offer giveaways, organize blog hops, etc
14. Create a hashtag for your products and services that can be shared on social media
15. Send inspiring information to your email list
16. Challenge yourself to share on social media 3 times a day
17. Interact with other artists and crafters through social media
18. Guest post for fellow artists


Looking for more art business tips and advice?

how to start selling your artwork- HERE

jump start a creative career- HERE


taking a leap into full time artist- HERE

coping with creative burnout- HERE

coping with failure- HERE

how to keep your work authentic- HERE

the art of chasing a dream- HERE

managing life and a creative business- HERE

the art of setting goals- HERE 

the art of blogging- HERE and HERE

the things I haven't shared- HERE

stronger than I ever knew- HERE


Friday, August 10, 2018

happy weekend!

Hey Friends! I apologize for my sporadic posting lately! I've been working really hard on some fun projects this summer that I am excited to share with you very soon. I promise I will be back to regular scheduled DIY projects and creative posts very soon!

LinkWithin

Related Posts with Thumbnails