This summer we've been in organization and clean up mode and one of the most important spaces on our list was Lucy's room. At only 100 square feet, the space is pretty limited in how we can configure things. And as she has gotten older, we've accumulated a lot of stuff that she has now grown out of so it was time to update and organize!
The first thing I did was paint the wall. As my long time readers know, I never want to feel like my home is "too precious" to take risks and try something unique, creative or even weird. While I love home decor shows, magazine and blogs- I also think it is easy to fall into trendy, safe and practical thinking when it comes to your house. I am not safe nor am I practical and I tackle most DIY projects like an artist. I love color, pattern and I believe that paint is one of the most affordable and easy ways to transform just about anything in your home into art!
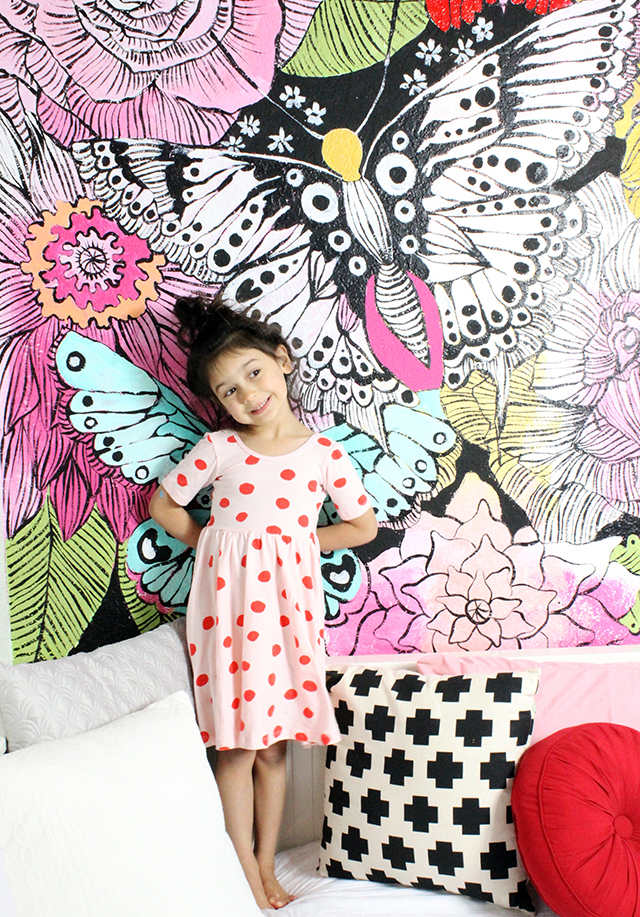
Over a year ago Lucy asked for a painting of Paris on her wall (you can see it HERE) and when it came time to change her room, she was excited to have a new mural on the wall. After lots of brainstorming together she asked for a butterfly garden! So I got busy making it happen!
I started by painting a fast coat of white primer over the top of the old mural. Once that white paint was dry, I added color. Then I began painting the designs. Here is a little peek into the beginning of this process.
I like to "draw" my designs with bold black lines- I use acrylic paint mixed with a little bit of water and then I use a brush.
After the black lines are dry, I go back in and add color to some of them and then other designs I let the color of background show through. The result is a really dynamic, bold and colorful mural.
While a mural like this might be too busy or colorful for some people, we love the way it looks and we also love that it feels like we are living inside of a sketchbook page!
Another big change we made to Lucy's room was adding lots of storage and bought her a new bed. We picked out the Hemnes bed from IKEA because it is big enough for her to grow into and it also has TONS of storage space below.
Since the mural is colorful and busy, we kept the rest of the room neutral and simple.
\
We moved her little desk (that has been in the dining room) into her room and created a small work space.
I love finding ways to create unique jewelry and now that Lucy is older, I love creating cute little accessories for her. To be honest, this fun ring project started out for Lucy but I loved them so much that I made some for myself!
Oven bake clay (or polymer clay) is so much fun because it is so versatile. It is also one of my favorites for making colorful jewelry.
Begin by selecting a few different colors of polymer clay.
Roll them out, press and sculpt into the shape of flower petals.
Press those petals together.
Continue to create petals and stack them on top of each other.
I created a variety of different flowers in different colors and shapes.
Bake the clay in the oven according to the directions.
While the flowers look great simple, I love using acrylic paint to add details to the polymer clay.
Last, glue the clay flowers to ring back. I like using E6000 glue.
These rings are so cute, whimsical and perfect for anyone wanting accessories with a little color!
If there is something I get asked a lot, it is what are my favorite watercolor supplies. So today I am sharing my entire list of supplies that I use every single day. From cheap to expensive these are my "go to" materials.
Angora Watercolor Set- A good budget friendly set that is not the most saturated or rich color but I like using this set for doing lighter washes of color.
Sakura Koi Sketchbox- My all time favorite set for travel and painting on the go
Raphael Travel Set- This is my current favorite set because it's affordable and the colors are super rich!
TIPS: Don't be afraid to mix up different brands (quality) of watercolors! I am notorious for using a cheap set in combination with my more expensive watercolors.
No matter what type of watercolors you are using, I always recommend taking time to experiment with mixing colors to see how many different colors and shades of those colors you can come up with.
TIPS: Keep in mind that different brushes will do different things and this is why I always like to encourage experimentation with materials before diving into anything new.
Try holding your brush at different angles. Experiment with different sizes and shapes of brushes. Try using different pressure as you apply paint. Make sure to notice how your brushes work with lots of water as well as with dry.
TIPS: Keep in mind that the type of paper you use will change the results of this process. You can use just about any kind of paper (especially if you are on a budget) but watercolor or paper made for wet media will enable you to really get that surface wet without the paper buckling.




 \
\


