Showing posts with label christmas craft. Show all posts

Tuesday, December 03, 2019

spin art gift boxes


If you’ve followed me all these years, you will know that I love finding unique ways to get creative with my holiday wrapping! It’s so much fun to incorporate making art with gift giving. In the coming weeks I’ve got som fun creative wrapping ideas coming your way!

Today I’m sharing a process- spin art gift boxes- that is fun for all ages and a really colorful way to create unique wrapping! Swipe left for the process.


We create lots of spin art around here and instead of using a spin art machine, we use a salad spinner. I add a heavy piece of cardboard to the bottom for stability.


Next, we placed our plain gift boxes inside the spinner. .
Then it’s time to add paint- we select 2-3 colors and added a dime size drop to the top of the box.


Then it’s time to spin! Sometimes you’ll get great results right away and then other times you’ll want to go back with layers of color and more spinning.


The boxes will need lots of time to dry and then you can use them for wrapping! They are perfect for small things or gift cards.


The best part of this process is that it’s colorful, messy and unpredictable! It’s also a fun way to add a little art to your gifting 


Need more handmade wrapping inspiration?


Thursday, December 21, 2017

handmade wrapping paper


As we move into a weekend full of hustle and preparation for Christmas, I want to encourage you to forget about the pressure to go spend more money on gift wrap! Instead challenge yourself to find simple, fast and creative ways to make your own! Here is a roundup of inspiration for you!


Tuesday, December 12, 2017

mixed media paper bows


It never fails, when I go to wrap a present, I realize that I don't have ribbon or bows. So over time, I've figured out some simple ways to create bows out of paper!
I have a lot of scrap paper with all kinds of mixed media layers and techniques on that paper. 
A simple bow is really easy to create with thick paper (like watercolor paper or cardstock.

Start with a strip of paper and fold each side into a loop.

Using hot glue, glue each edge down.

Add a smaller strip the the center.
The last step is to add two strips of paper glued to the back of the bow.

You can also create a variation of that simple bow by cutting your paper into a bow tie shape.

Next, fold each edge into the middle to create two loops and glue down.
Add a strip to the middle.


Add tails to the bottom to finish off the bow.


You can also create gift bows by cutting strips of paper- it helps to have those strips of paper the same width. I cut my strips around 3/4". 

I cut 5 strips, leaving 2 of those strips the original length (11 inches) and then I cut off about 1/2" from 2 of the strips and then 3/4" from 1 strip.

Next, twist each strip to form a loop at each end and glue in the center.

Layer the twisted strips on top of each other- the longest at the bottom and smaller at the top. Secure with glue as you layer.

These bows work best with lighter weight paper.


Monday, December 19, 2016

gingerbread house wrapping

There is nothing that I love more than simple ideas that can be executed on a budget! One of my favorite holiday tricks is to simply use a roll of brown paper, a white pen and a little creativity to make unique wrapping paper.


Brown paper can typically be found at the hardware store or home improvement store- a roll will coast around $5. There are all kinds of white pens out there by lately I am loving the Uni-Ball Signo Gel Pen.

Start by wrapping your presents with brown.
Then get creative adding simple, decorative and whimsical house drawings!
The result is pretty little packages that have the look and feel of gingerbread houses.


Looking for more holiday wrapping inspiration?


Monday, December 08, 2014

oven bake clay present toppers

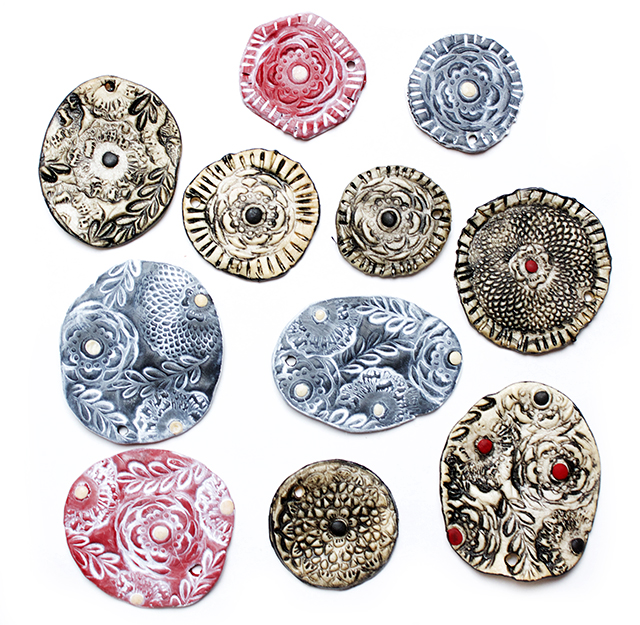
Oven bake clay is a great alternative if you want to play around with clay projects! One of my favorite things to make during the holidays is present toppers that can double as little ornaments.
I started with a few different colors of Sculpey oven bake clay - red, black and off-white. I grabbed a few of my favorite flower stamps from my collection. Anything that makes an impression can be used to make an impression or stamp into clay-stamps, leaved, flowers, decorative buttons, decorative jewelry are all things that can be pressed into clay!

I rolled my clay into little free form disks and then pressed my stamp into the surface and carefully pulled it away.

I poked a hole in each of my clay disks.

Next I baked the clay in the oven according to the directions on the packaging (275 degrees for about 15 minutes)

Once the clay cooled I painted the surface. I completely covered the entire surface with black acrylic paint.
While the paint was still wet, I wiped it from the surface with a damp cloth. The paint settles into the nooks and crannies of the designs!
The end result are rustic looking little present toppers that can also be hung on the tree!


LinkWithin

Related Posts with Thumbnails