Wednesday, March 31, 2010

eggs and nest tutorial


After purchasing a bag of plastic easter eggs for another project, I ended up having a lot of eggs left over and decided to alter the eggs and create pretty little nests out of fabric three different ways! All of them are easy last minute Easter projects and I liked them so much I will be using them around the house year round!


#1 white crackle eggs and nest


Start by giving the eggs a base coat of paint and let dry.


For the crackle- you could use crackle medium but I actually like to use craft glue to get the same effect.

Cover the surface of the eggs with a layer of glue.
While it is still wet apply white paint to the top of the glue and let dry.
Crackle will start to appear as it dries.


To create a fabric nest, use a bowl and cover with plastic wrap.


Drape white fabric (I used muslin) over the top of the bowl and apply fabric stiffener.
Let dry completely.


Once dry, peel off the fabric bowl.


Fill the nest with eggs!


#2 graffiti inspired eggs and nest

Paint your eggs with lots of messy color, swipes and lines.


Paint over the top of the bowl with more messy swipes and color.


fill the nest with eggs!


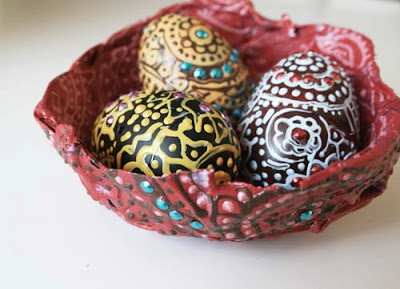
#3 decorative eggs and nest

Fill the egg with decorative designs using 3-D paint (like the pin wheel tutorial)
Glue little gems or embellishments to the surface.


Paint the nest and add the same decorative designs and embellishments.


Fill the nest with eggs!


Tuesday, March 30, 2010

hittin' the road


I am hittin' the road for a month,


packing up all of my crazy stuff,


and takin' care of some business and having a little fun!


First stop- Colorado!
(not to fear- I will be blogging and creating from the road!)

Monday, March 29, 2010

goodbye purses


dear graffiti purses,
I was sad to see you leave my studio today, I love each and every one of you and I will miss you so much. I really hope you have lots of fun at Sara's graffiti wedding!
love, Alisa


Sunday, March 28, 2010

one of my little dreams


Once upon a time (or about a year and a half ago) I ran into a lot of rejection with a number of "green themed" and recycling ideas that I pitched for a variety of projects. It seemed the opinion with craft industry professionals was that green is a trend that would run its course, that the market was flooded with green crafting concepts and eventually everyone would move on to something else. I've gotten used to rejection but it is always discouraging, especially when you don't agree and ESPECIALLY when the ideas come from deep in your heart.


I decided to forget about industry opinions and to follow my green, trash loving, creative intuition. I continued with my mission to spread the word- that dumpster diving can be just as fun as shopping at Michaels! I am SO passionate about my cause- about recycling, creating with intention and being aware of how we consume and spend money on the things we make. I believe art should come from the unexpected (even trash!), cost little money, it can inspire change, evoke a conversation and make you smile.


That is why when I received an email from Ms.Brown- an elementry school teacher in Canada- I got a little choked up. She is using my recycled city project in her classroom to teach the concept of community, shelter and wants vs. needs. They have started their own cardboard city, full of color and wonderful details that only kids can come up with! And while some artists dream of fame, fortune and industry success, my dreams are kind of simple these days- I want to inspire thought, conversation and change through art. Thank you so much to Ms. Brown and her class for making one of my little dreams come true (and for making all that rejection TOTALLY WORTH IT).


Saturday, March 27, 2010

painted pinwheel tutorial


I love pinwheels- they are simply whimsical and remind me spring! When I set out to make my own out of paper- I quickly lost the inspiration to cut and fold. So while browsing my local craft store, I came across these tacky princess Disney pinwheels (sorry Disney fans I just wanted something more creative) and I couldn't beat the price- just 99 cents! I decided right there in the clearance aisle I would reinvent these pinwheels and turn them into something I would actually be proud to display!


Start by painting over the old pinwheel- I used spray paint but you could use acrylic paint.


Let the surface dry.


Decorate each petal with paint.
Honestly this was really time consuming because I was not able to take the pinwheel apart to paint so I slowly painted each petal while taking time for them to dry in between.


I used Scribbles 3-D paint because I wanted a very detailed pattern inspired by the look of a henna pattern but you really could do just about anything on the petals with paint, pens and lots of color!


Once I am finished, I will be putting all of my pinwheels in a vase to use as a centerpiece!

Thursday, March 25, 2010

colorful canvas eggs tutorial


I've put together a handful of Easter projects that I will sharing in the days ahead! Since I love working with canvas I just had to come up with a way to make canvas eggs. These colorful eggs are made from (my favorite) Studio Sticky-Back Canvas! I decided it made more sense and was much cheaper to buy a bag of plastic eggs (24 for 1.99) and use creative ways to transform them!


If you haven't used Claudine Hellmuth's Sticky-Back Canvas - you must try- it is a sheet of canvas with a sticky back, just peel off and stick to anything!
Start by cutting strips of canvas.

If you do not have Sticky-Back Canvas, you could use strips of canvas, fabric or paper with glue. I chose canvas because I love the texture.


Wrap the strips of canvas around the egg (either horizontal or vertical).


I did not care about the eggs opening so I covered the seam on the egg but you could also keep the seam so it opens and closes.


Once the entire egg is covered in canvas, paint with diluted paint. This will soak into the canvas and let the texture show through.


Create little canvas flowers.

Remember the Blooming Belt Tutorial that I made a while back?
I created these little canvas flowers the same way I did for the belt, just smaller.


Glue the flower to the top of the canvas (any glue will work).
Paint the flower.


Add details to the flower with colorful dimensional paint.


Create a colorful variety of eggs to use in your Easter festivities!


LinkWithin

Related Posts with Thumbnails