Showing posts with label canvas. Show all posts

Monday, April 18, 2016

pool noodle printing

When it comes to my creative process, I am always looking for fast and easy ways to add texture, pattern and layers of paint to my large surfaces (like yardage of handmade fabric and canvas). Back in 2011, I created handmade rolling pin stamps. At the time I had not seen anything like this on the market but I really needed tools that would enable me to quickly fill a surface. Well, recently I decide that I needed a bigger solution! Again, I like to use tools that enable me to quickly add layers of paint to a surface. The idea I came up with was using pool noodles and turning them something that I could roll and print.

Today I thought it would be fun to share a few different ways that I like to put a pool noodle use!

So a pool noodle is a flexible foam pool toy that can be used for floating, exercise and water play. They are big which means you can use them to create really large "rolling pin like" tools. I purchased two, each for $1.00. Then I cut them up into different sizes.


You can use just about anything that has texture (like fiber, string, plastic, leaves, etc) to wrap around a pool noodle. I love bubble wrap and I love using it to create lots of dots in the layers of my messy paintings. I wrapped a big piece of bubble wrap around the pool noodle and use it to roll out a lot of dots!

While you can roll the noodle through paint, I've found that it's easier to use a brush to apply paint the surface.


Simply roll over the top of the surface. 

You can also use a wood burning tool to "carve" a pattern or design into the surface of the foam. Always carve foam outside or in a well ventilated area.

Grab a sheet of craft foam and cut it into shapes. Using hot glue, glue those shapes to surface of your pool noodle.

You can even burn designs into those shapes to create even more details!


And you can also use the round ends of those pool noodles to create stamps- take it a step further and carve designs into the ends to add pretty details!


Keep in mind, this process is never going to get you a perfect and clean imprint...I mean your using a pool noodle for goodness sakes! But you will be able to cover a lot of surface area with texture and pattern. This process is great for building up painted layers, adding the illusion of pattern and texture and honestly, it's just a lot of messy fun (for all ages)! 

So the next time you pass by the pool toys at your local dollar store, grab a pool noodle and start creating.

Wednesday, February 10, 2016

canvas supply bag

I do a lot of traveling back and forth between my home and my studio and that means I am always lugging a bunch of supplies with me! Recently I found THIS canvas supply tote (this post is not sponsored) and I thought it would be perfect for transporting supplies.


The tote is heavy duty canvas and has 8 large pockets and 16 small ones and is designed to stay open when you set it down- perfect for a variety of random supplies. There was no way I could leave this tote plain so of course I used acrylic paint and added messy layers of color to it. I used a combination of Golden Fluid Acrylics, High Flow Acrylics and Blick Matte Acrylics. 

TIP: I've found when I am painting on heavy duty canvas, I prefer to use fluid acrylics because them seem to spread and soak into that heavy canvas better.

I gave the tote a quick layer of messy color and a few simple details and just like that it was transformed into something that felt a little more like me!


Friday, October 10, 2014

fashion friday- canvas glasses pouch


I've worn glasses since I was fifteen and while I tend to wear my contacts most of the time, I have always loved expressing myself with unique and fashionable frames. But I've got a little problem...I treat my glasses TERRIBLE! I toss then in my purse, store them in a drawer and pretty much never use a case.


Typically I shop for glasses at my local optometrist but when luxury eyewear brand David Kind asked if I would like to try their "shop at home experience", I jumped at the chance to select frames in a new and wonderful way. After a stylist selected 6 frames for me to try at home,they arrived at my doorstep and I picked out a new pair of glasses. 

These new glasses were just too darn nice to throw in my purse so I decided enough was enough! I need some cases to store my glasses so I got busy making my own.
Making a case for glasses is just about the easiest project that a sewer of any level can tackle- all you need is to know how to sew a straight stitch!


I grabbed scraps of my painted canvas to create a handful of really colorful and expressive little cases.

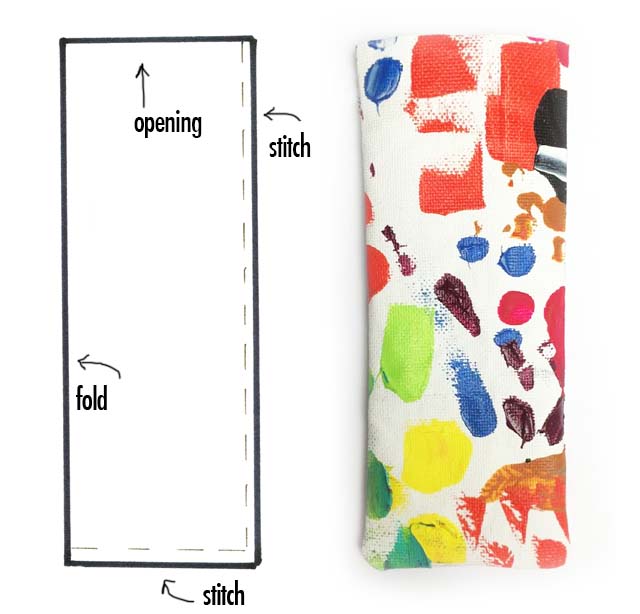
I cut them to size. Mine measured 5 X 6.5 inches- a little bigger than I needed because I wanted the cases to also be used for sunglasses. Optional: line the inside of your canvas with fleece or felt.

I folded the canvas in half (so they measure 2.5 x 6.5 inches) and sewed up the side and the bottom! SO simple!


The result are cute and colorful cases that are sure to keep my glasses in better shape!


glasses c/o David Kind


Thursday, March 25, 2010

colorful canvas eggs tutorial


I've put together a handful of Easter projects that I will sharing in the days ahead! Since I love working with canvas I just had to come up with a way to make canvas eggs. These colorful eggs are made from (my favorite) Studio Sticky-Back Canvas! I decided it made more sense and was much cheaper to buy a bag of plastic eggs (24 for 1.99) and use creative ways to transform them!


If you haven't used Claudine Hellmuth's Sticky-Back Canvas - you must try- it is a sheet of canvas with a sticky back, just peel off and stick to anything!
Start by cutting strips of canvas.

If you do not have Sticky-Back Canvas, you could use strips of canvas, fabric or paper with glue. I chose canvas because I love the texture.


Wrap the strips of canvas around the egg (either horizontal or vertical).


I did not care about the eggs opening so I covered the seam on the egg but you could also keep the seam so it opens and closes.


Once the entire egg is covered in canvas, paint with diluted paint. This will soak into the canvas and let the texture show through.


Create little canvas flowers.

Remember the Blooming Belt Tutorial that I made a while back?
I created these little canvas flowers the same way I did for the belt, just smaller.


Glue the flower to the top of the canvas (any glue will work).
Paint the flower.


Add details to the flower with colorful dimensional paint.


Create a colorful variety of eggs to use in your Easter festivities!


LinkWithin

Related Posts with Thumbnails