Sunday, November 15, 2009

Creative, Messy, Flurry


Yesterday was a creative, messy, flurry of a day spent teaching- Canvas Remix: An Experience- at The Center for the Arts Escondido and everyone in this class did me proud! Not only did they make a huge mess, they all create fabulous painted canvas AND were able to create super fabulous purses- this is A LOT of work to fit into one day but so worth it!!
Every single time I pack up my supplies and teach a class, I am inspired, excited and completely thrilled that I am living and pursuing this creative life.


Wednesday, November 11, 2009

My Gratitude on Veterans Day

This is my husband. He has hair longer than mine, lots of facial hair, he is a die hard surfer, a yoga master, he is a brilliant chef, super liberal, an amazing artist, builds and destroys structures for a living, keeps me grounded everyday and he is a veteran. Five years served as Search and Rescue in the Navy. I am so grateful that he served his country (hanging out of helicopters) but am even more grateful that he is a civilian these days. My gratitude to you my dear husband on this Veterans Day.

Tuesday, November 10, 2009

Recycled Wreath Tutorial


My love and passion for toilet paper rolls is soaring to new heights this week! I have been filming and creating non stop for my Haute Holidays online class the last couple of days and this means I am in full holiday mode and trying to find new ideas and projects to share! And this also means finding new and different ways to put toilet paper rolls to use! (I promise my next tutorial will not involve anything related to toilet paper!)

Today, I had the bright idea to make a non traditional wreath from cut up cardboard rolls.


Start by cutting the cardboard rolls into sections- varying in width.


Line up the sections into a circle- this could be small (even ornament size) medium or even really large!


Glue each section together and start forming the shape of the wreath.


Once the wreath is complete, begin to make small circled from the rolls or even from cardboard boxes- roll strips up into a circle.


Add smaller circles to the inside of the larger ones


Build up your wreath with as many circles as possible.
Once you are satisfied hang it on the wall!!
(Optional- paint it, give it a layer of gloss, add a bow, add cardboard shapes!)
I ended up painted my wreath black to match my living room decor!


Monday, November 09, 2009

Recycled Fall Napkin Ring Tutorial


I have a confession to make...I think that toilet paper and paper towel rolls just be be the greatest things to create and craft with! I have always loved them, in fact, even as a kid I created all kinds of fabulous things from cardboard rolls (I will share that with you later this month!) So for today's tutorial I decided to transform a paper towel roll into colorful napkin rings.

It is that time of year when we all start having more people over and entertaining. As always I am looking for ways to go cheap and creative....I love finding a way to make something that would typically be purchased- Especially when it comes to decorating and entertaining!


Start with a paper towel toilet paper roll
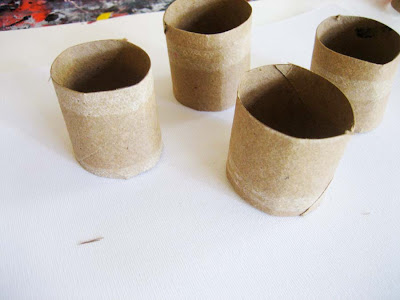

Cut the roll into even sections (I decided to just make four rings)


Paint each section with a THICK layer or two of paint- this will begin to thicken the surface of the cardboard and make it a little more durable. (I am using Claudine's acrylic paint in my most farvorite color- Classic Teal- YUM!)


Once the outside is dry paint the inside- again with a thick layers of paint. Set aside to dry.
(Optional- you can a layer of gel medium or even polyurethane for additional shine and durability.)


The next step is to create little flowers from colorful fabric.
Start by cutting out a variety of circles in different shapes.


Use a needle and thread and gather the fabric around the needle creating a messy ruffle.


Add different layers and sizes of the circles in the same way until you are satisfied with the look. (A variation could be creating a fabric yoyo- but I wanted a more free form, messy look)


Add a handful of small black beads to the center of the ruffle. You could also use buttons or even a contrasting color of fabric to the middle.

Set your flowers aside


Take your painted rolls (at this point they should be completely dry and be much more durable) Sew simple stitches along the top and bottom of the rolls. I kept the stitches simple but your really could have fun with using colorful thread and even more decorative embroidery!!


Glue the flowers to the surface of the rolls with either hot glue or craft glue.


And there you have it...simple, cheap and super cute napkin rings for holiday entertaining!!


Updates from the Studio and Giveaway WINNER

Happy Monday everyone can you believe it is November already?!?!


First I want to announce the winner of the fall leaves clutch- it is suzanne390! Suzanne if you could email me your mailing address I will get this sent off to you!


As usual, I am pretty much spinning trying to get things made, finished, created, designed and still find time to just be normal! But things are going quite well and I feel like I am slowly carving out a groove that works for me in this new life working for myself- it may be busy but it is a groove!!

I have been putting together lots of tutorials to share with all of you out there in the next couple of months and there is some fun stuff that I cannot wait to post so stay tuned!

I have been working upstairs in the house in evenings (something I am not really supposed to do because of how messy I am!) and in true "Alisa" form I discoverd by accident that the jar of Claudine Hellmuth's Studio line multi medium looks exactly like my favorite philosophy brand moisturizer! I almost applied medium to my face- No more bringing supplies upstairs for me!


I am gearing up to teach this weekend at the California Center for the Arts Escondido this Saturday, November 14th and there is still time to register! It is only $45.00 for non members and all supplies are provided!! If you are in Southern California I would love if you joined me!!!

I am also planning my teaching schedule for 2010 and it is looking like I may be coming to NYC, Portland, OR, my hometown of Seaside, OR and more! If you are interested in a messy class coming to your area feel free to email with any ideas!!!

I am in the process of adding new things to my shop- and will continue to add lots of homemade goodies for the holidays!

I have new arm warmers and some new fiber and paint necklaces!!


Friday, November 06, 2009

Fall Leaves Clutch Giveaway!

It has been a while since I had a giveaway. So to celebrate the changing colors of the season- I am giving away one of my new clutches. Along the theme of the last couple of fall leaves tutorials, this clutch is yet another interpretation of fall colors and inspiration- can you tell I LOVE this time of year?!?!

Here are the rules-
Leave me a comment- tell me your favorite thing about fall
You have until Monday

Ready, set, go!

Emerging


I am emerging after taking a little break the last few days to remember my grandmother who passed away this week. After some time spent processing and reflecting, I am now ready to return to my creative life more to come...

Tuesday, November 03, 2009

Updates from the Studio

It is really cold here in San Diego ( as an Oregon girl, I feel like a wimp even saying this! ) and my studio has been freezing. Last week when I couldn't find my arm warmers I resorted to cutting up a pair of tube socks to keep my hands and arms warm while having my fingers free to work! I vowed to myself when I had a little time I would experiment with creating some much more stylish arm warmers out of upcycled sweaters and that is what I did this weekend! I had so much fun creating these for my own cold hands that I decided to create a bunch for my shop so keep your eyes peeled for some super funky arm warmers coming really soon!

Speaking of my shop, I will be clearing out the the sale section in the next week or two and begin to add all kinds of new creations for the holidays. While I will still be making lots of goodies from canvas, I am moving forward with some new ideas and new creations and want my shop to reflect where I am at and stay current with what I am creating!


Last week I drove some projects up to the Stampington headquarters which was a wonderful excuse to get myself out of the house! They are such a fabulous group of people and their space is so fun and inspiring to visit! I will be working on a handful of new projects for some of their upcoming publications. This has actually become one of my favorite things to do- having a theme, a project to work on for a publication brings me back to art class assignments and actually inspires me in new and different ways!

Next weekend is my workshop- Canvas Remix: An Experience at the Center for the Arts Escondido- this class is a great opportunity to get a little canvas remix 101 for all those curious about my messy concepts when it comes to working with canvas! All materials are included and all levels of experience are welcome!

You are not going to want to miss the collaborative graffiti weekend with myself, Traci Bautista and Lisa Engelbrecht at the Art Bar in Santa Ana, December 4-6th! I know it is going to be a wild and creative weekend!!

I have been planning my teaching schedule for the spring and summer and it is looking like a weekend class in NYC is in the works- I will keep everyone posted with details!! So excited!

I have all kinds of new and fun tutorials coming soon to my blog and I cannot wait to share some fun holiday inspiration. If you have been inspired to create anything that I demo please send me photos so I can share your work! I love seeing how others put their spin on things!!

Ok...now down to my cold studio to start the day!!

Monday, November 02, 2009

Fall Fiber Place Mat Tutorial


I couldn't resist posting another tutorial inspired by my recent fall fiber wreath project! My next online class Haute Holidays started today (yes I am juggling 2 online classes at once!) and I am now in full holiday creating mode and came up with this fall fiber place mat project and thought I would share it here!

This project is along the same lines as the creating the canvas and fiber leaves used in the fall wreath. Start with a variety of painted canvas, fabric, even paper!

Cut out different pieces into large leaf shapes

I made sure all my shapes were a little different and also made sure they were the right size to fit at our round dining room table.


Layer all the leaf shapes on top of each other- keeping in mind contrast as you stack and layer.


Sew all the layers down, using the machine to create messy stitches and free motion designs.

Use in your fall table settings as place mats, a table runner or even in a center piece!

LinkWithin

Related Posts with Thumbnails