

Recently I did some rearranging in our living room. After moving things around, I was left with a big space in one corner that was screaming for a hanging plant! While there are some really pretty macrame hanging planters out there, I was inspired to create a rope basket planter. The process is crazy easy!
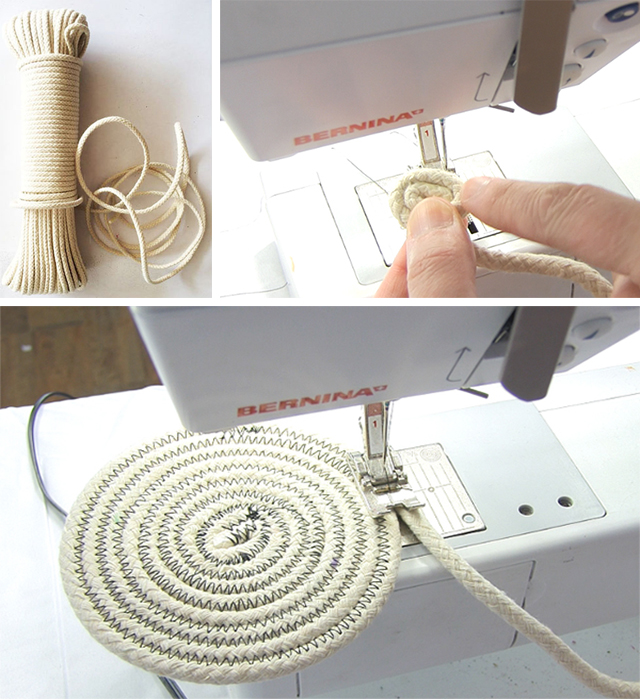
You can make a coil basket out any thick rope or twine, you can even use scraps of fabric wrapped around the rope for something really colorful. But I like to keep it simple and use rope (out of everything I've tried, I liked using clothline the best).
To begin, coil the rope. Using a machine, zig zag stitch the coil together and keep coiling and stitching.
TIP: I spend lots of time sewing heavy duty and non-traditional materials on my machine- I typically use a denim needle for these kinds of projects.

Once you have the base of the basket you can create the sides by tilting the coiled rope as up as you sew.

Continue sewing until the basket is desired size.
TIP: The more you tilt the the base, the more dramatic the curve of the sides will be.

I created a basket to fit a self watering plastic pot which meant that I needed to build the walls of my basket higher than the pot so the pot wouldn't show.

I also created little loops around the edge of my basket.

Next I tied rope to each of the loops and I added glue to the knot to keep it secure.

I repeated this process on all of the loops.
The last step was to paint my basket. While I love using lots of color, our living room is decorated in lots of white and neutral colors with pops of blue so I wanted to keep it simple. I started with a thick layer of grey acrylic paint and then added lots of drizzles over the top.
I repeated this painting process on the inside of my basket.
TIP: While you could keep the rope natural, I really enjoy painting my handmade baskets. It adds a unique look but it's also another way to stabilize the basket. After a couple coasts of paint, the rope basket will be very firm.

Next, I potted a long house plant in the pot and then placed the pot into the basket.
Last, I hung the hanging basket.


Need some more rope inspiration?


