

With fall in full swing I am continuing to post tutorials that are inspired by the season and today is another alternative Halloween project. I think it is pretty evident that I believe that ANYTHING can be transformed with a little paint!

This week I found one of those ugly but cheap plastic jack o lanterns for trick ($1.99) for treating. Since we don't have kids and there won't be trick or treating in our house, I decided to turn it into a decorative little lantern! (but this would be another great kids project if you have little ones that will be collecting candy)

Start by cutting out the eyes, nose and mouth with utility knife. You could get really decorative with this but I am clumsy and prone to injuring myself and wanted to keep it simple!

Give the the lantern a full coast of paint to cover the entire pumpkin- you may also paint the inside at this time if you prefer.

Draw simple doodles all the surface- I chose flowers but you could use simple shapes, words, your favorite pattern- just try to fill the entire surface.

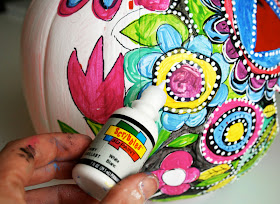
Begin to fill in your shapes with paint. Living in San Diego, fall and winter often don't feel like fall and winter so I decided to painting my lantern with bright summer colors that would match my house and my garden this time of year- its typically blue sky and sunny :)

Switch out the ugly elastic handle and add a ribbon for the handle
Add a tea light candle

I decided to use my lantern as a table centerpiece (paired with my painted skulls and messy painted pumpkins)


ooo alisa, this is so cute! thank you for all your tutorials! i am sure that one of the children i know would be interested in doing this project!!
ReplyDeletejean
If only Cinderella's carriage turned into that PuMpKiN!!! That Rocked! :) oxox- Kim
ReplyDeleteI love you... I'm in art club right know I found the paper mache skulls for 1.50 and the kids are having a ball. They just saw the lantern. There homework is to find the lantern and away they create. :)
ReplyDeleteThis is a GREAT inspiring idea! I love the Dia de los muertos look! thanks
ReplyDeleteI love it Alisa!
ReplyDeleteso flippin RAD!
ReplyDeleteAll your artwork is rocking! The pumpkin idea is great...I think we all should have at least one "cool" pumpkin that shows how artistic we can be.
ReplyDeleteThanks for the idea!
Kelly
Love how you will paint anything that isn't (or is) nailed down! Great idea! You are really helping us to see EVERYTHING in a new light! Way to go! So inspired by your blog!
ReplyDeletelove this!
ReplyDeletewow, looks fantastic, and i love it all grouped together, tfs.....
ReplyDeleteLove this idea and I like your tunic also.
ReplyDeleteThis is really fantastic. I love it!
ReplyDeleteI bought a pumpkin today!
ReplyDeletetime to start painting!
what fun
Susan
waay cute.
ReplyDeleteWow! That's amazing! I'm sad I didn't see it earlier. I LOVE how you transform everything with paint! Your skills are awesome!
ReplyDelete